BengalCore QuickBooks Addon - SmartEtailing Inventory Export
This addon for QuickBooks Point of Sale allows for the automatic uploading of inventory to your SmartEtailing web site, allowing for synchronizing between actual inventory and your web customers. This page will help in explaining how to install and run the program properly.
Installation
- Close QuickBooks POS
-
The install consists of 2 files, bundled together either in a zip file or on a CD. They are:
- BC.SmartEtailing.Addon.msi
- setup.exe
- Run setup.exe
- Click ok to start the installation and to complete it
- Restart QuickBooks POS
Allowing Access
Depending on your QuickBooks POS set up, you may be asked to enter your QuickBooks POS Admin password.
This is the password associated with your QuickBooks POS software so contact your QuickBooks POS administrator.
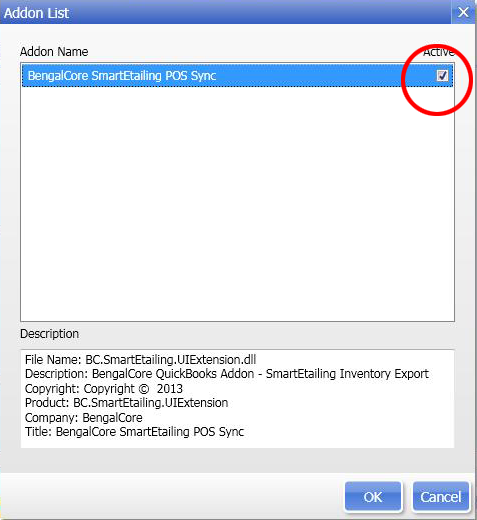
The first time that you run QuickBooks Point of Sale (POS) after running the installation,
a dialog box will appear, asking if you want to allow the BengalCore Addon to run. Select
the checkbox allowing the addon to run.
Product Key
The first time you run the BengalCore Addon, you will be asked for your Customer Name and key.
This is provided via email from BengalCore after your purchase. Please enter the information
exactly as provided. Product key information is valid for 3 days. If you attempt to use the
product key information after 3 days the action will fail and you will need to email
BengalCore for new key information. There is no charge for this and entering key information
is a one time operation that should not need to be repeated.

Getting Information from SmartEtailing
SmartEtailing will send an email with the FTP Upload Site (this is pre-filled for you already), your FTP User Name and your FTP Password and that information should be entered into the appropriate places in the Settings panel of the BengalCore integration tool. Please be careful to type the information exactly as provided or cut and paste from the email, being careful not to pick up any extra spaces. If you have not subscribed to SmartEtailing's POS Sync feature, contact info@SmartEtailing.com.
General Usage
There are two (2) options for uploading your QuickBooks POS data to SmartEtailing within the integration tool.- Option 1 - full, unedited upload. For Option 1, you can simply check the Upload automatically box and the file will be uploaded at the designated time shown. You may also force an upload anytime by clicking the "Upload Now" link under the Upload Time field. The BengalCore integration tool should remain open (active) at all times in order for automatic uploads to execute. As long as the tool is active and your system has an internet connection, the automatic uploads will occur at the scheduled time each day.
- Option 2 - Should you wish to use the sale prices for an item or group of items or if you wish to remove some items from the upload, you may click the "Get Inventory" button at the top left of the integration tool to load your inventory into the display area. At that point you can enable sales, remove items from display or simply review the data coming from your POS system. When you are ready to send the data to SmartEtailing, click the "Export Inventory" button. Each subsequent automatic daily upload will respect the choices made when uploading data until those choices are changed. In other words, items will remain on sale or removed from upload until you change your selections. To enable daily automatic uploads, be sure to check the box to enable automatic uploads in the Settings section.
Detailed Usage
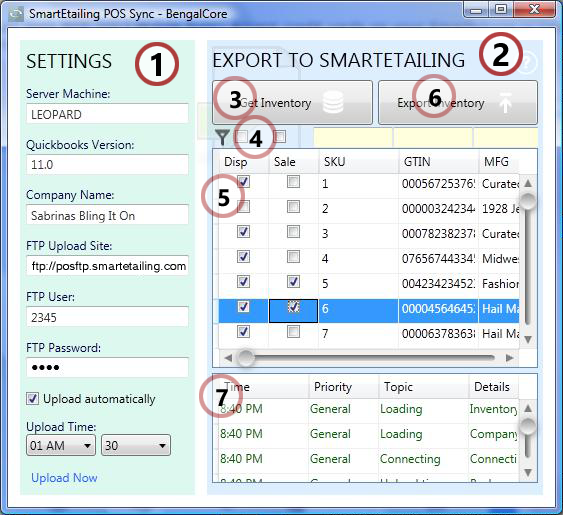
The following image shows the main form for the BengalCore QuickBooks Addon for SmartEtailing Inventory Export. Below
is a description of each numbered area.
-
The green area contains user settings. These setting are remembered between runs of the program.
The following values are needed for proper execution:
- Server Machine is the name of the computer running the QuickBook database. This is filled in by default with the computer name, but may need to be changed based on configuration.
- Quickbooks Version is the version of QuickBooks POS that you are running.
- Company Name is the name given to QuickBooks for your company data.
- FTP Upload Site is the FTP path to your SmartEtailing account. You should have received an email from SmartEtailing detailing this information when you upgraded your account to include SmartEtailing's POS Sync feature. The BengalCore Addon needs to know the FTP address, user name, and password in order to automatically upload the inventory to your web site.
- FTP User is username for the FTP path to your SmartEtailing POS Sync feature and is always a 3 or 4 digit number.
- FTP Password is password for the FTP path to your SmartEtailing POS Sync feature.
- Upload automatically triggers automatic nightly upload of your POS data to SmartEtailing.
- Upload Time defines the time at which to perform a daily update to your web site. Times between midnight and 3:00am Pacific Time are recommended.
- The blue area contains details about an export operation.
-
Manually Exporting is a 2 step process. Step 1 is to load inventory from QuickBooks by clicking the Get Inventory Button and making
decisions about what should be uploaded. Step 2 is to Export your Inventory to SmartEtailing by clicking the Export
Inventory button.
Pressing this button will fill the list below it with your current inventory.
If all inventory is to be uploaded without changes, simply click the Export Inventory Button to complete the manual upload to SmartEtailing.
NOTE: Enabling Automatic Upload (in the green settings area) automatically uploads your QuickBooks POS inventory. These steps are not needed for the automatic upload. The latest settings for which items to display and which items are on sale are used during the automatic upload. - The yellow textboxes allow you to filter the data in the inventory list based on SKU, GTIN, Manufacturer, or Description. This is helpful for setting display and sale checkbox values.
- This list contains your current QuickBooks inventory available for export to SmartEtailing. The first column is a checkbox that allows you to turn on/off the export of this inventory item to your web site. The second column is a checkbox that defines whether that item should use the regular price or the sale price as set in QuickBooks.
- The Export Inventory button performs the export of the selected data into the format defined by SmartEtailing for upload of that data to your web site.
- This is an information only area that provides details about each upload of inventory data.